5 Stages of Representational Painting
Ross Whitlock, a well known Nelson artist, once said to me that we are all self taught artists, no matter what art education we chose throughout our artistic career. It’s true, a teacher can give you guidance and may speed up the process a little, but it’s only through practice that you can develop into you own artist. Consequently we feel sometimes a little wobbly on our creative path and wonder if we are going in the right direction. Then you cross the paths with someone who is working similarly and a lightbulb comes on like a bang. This is what happened when I listened to Jed Dorsey in the Learn to Paint Podcast (5. Episode 27). He talked about the five stages in representational painting. I have added an extra stage for watercolour painting (value sketch):
- Design (1.2 Value sketch, watercolour painting)
- Draw
- Block-in
- Refine
- Finish
“Boring!” You might think, “it’s much more fun to start painting straight away.”
You are enthusiastic and want to jump right into your work. We all know that feeling. Who wants to “slow down” and do a lot of prep work before being allowed to get the paintbrush out?
Beware! A simple still life from start to finish takes me about 2-4 hours when I do my preliminary work. Where I go straight into painting I work hard for a minimum of 4 hours. The reason is that it takes time fixing problems. It’s a lot faster to plan ahead so the problems won’t show up in the first place.
The lovely thing about working in five stages is that you can check in each stage how your painting is going. This is how it goes:
1. Design
In the first stage you evaluate the design of your work. This means you look at your composition, which includes your shapes, balance, distances, angles, colour harmony. I encourage everyone to start with little thumbnail sketches (roughly 2cm x 3cm). Try to create at least eight different sketches. If you work with a viewfinder, include various angles of your subject and zoom in and out. If you work from a photo you will probably not explore different angles, but you can still zoom in and out (crop). You can take things out that don’t help your painting’s story or you can move them around to create better balance.
While you are drawing these thumbnail sketches allow yourself three values (dark, mid-tone, light). This will show you how your light and dark shapes work together and balance. This process takes about 10-20 minutes.
It’s surprising how creative you get when you are forced to do eight different sketches. Very often the last three sketches are the most interesting because you are forced to get creative and think outside of the box. Sometimes however, I refer back to my first sketch and confirm that it is still my favourite.
Design is the most important part of the painting process. When your design is poor, your colours and drawing can be as good as you want, the painting however, will never be a great painting. This means you have wasted several hours creating something mediocre and may spend even more time fixing it.
On the other hand, a painting can be pleasing despite poor brushstrokes and ok colours, if the design is good.
After my thumbnail sketches I do a little colour analysis, which means I choose the three primary colours I can see working best. I like to limit myself to three colours (if possible) and mix all my secondary colours and greys. This makes the painting process a breeze and I have instant colour harmony.
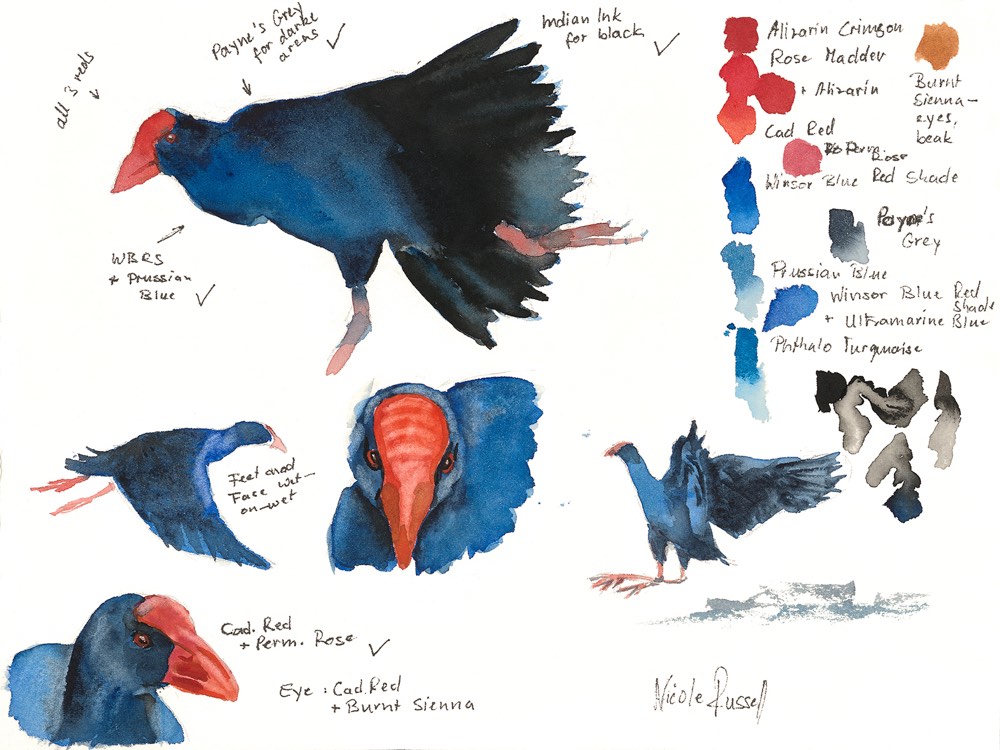
1.2 Value Sketch (Watercolour)
Normally the thumbnail sketches are all I need before starting with my final work. However, if I’m planning a watercolour painting I like to add an extra step: a little value sketch (tonal value). It is a pencil sketch of approximately 10 cm height. The width depends on your aspect ratio of your final work. I work with 5-9 tonal values, basically reflecting the values I will use in my final work. Since watercolour paintings are done from light to dark it allows me to account for highlights and familiarise myself with reflections, plan which areas are done wet-on-wet and which ones wet-on-dry or glazed. I make little notes on the side and hope that I remember to read them when I start my big work.
2. Drawing
In the drawing stage you transfer the design on your canvas. It is very important to make sure that the aspect ratio of your design and your canvas are the same (I have made mistakes here before). It is also important to stay true to your original design. Don’t let any variations creep in! The placement of the objects is what counts. Take your design as your brief and stick to it.
In my watercolours the drawings are done with the pencil. In my oil paintings I use paint and draw with a filbert brush.
3. Block in
In the block-in stage you fill your shapes with colours and values. Don’t get sidetracked and start bringing in detail before you have covered up every part of the canvas!
Your paint application should be thin so it’s easy to apply changes, but not too thin so parts of the canvas still peek through. Start with the darks. This way they stay transparent, thinner and appear underneath.
Now step back and evaluate how all the colours and shapes work together. At this stage changes are still easily done. If there is the slightest thing bothering you and the little voice in your head is trying to tell you something, this is the time to listen. No matter how inconvenient it is or how unmotivated you feel of changing something, if you don’t do it now, whatever bothers you a little now will be even more obvious in the next stage.
4. Refine
This is the longest stage. Now you are allowed to pull out all your tricks to create the illusion of an image (form, volume, depth, atmosphere, etc.). Have fun painting!
Once you think your painting is finished give it a break. I like to prop up my work in the kitchen/dining room area where I see it often and evaluate if it’s truly finished or if it needs some adjustment.
5. Finish
While the painting is propped up having a break it will start talking to you, truly! If your painting is a full success, it will tell you. If it needs finishing touches, it will tell you. And it will also tell you where and how to do it. You can take a photo of your work and glue it in a visual diary and write notes next to the areas that need a bit of work and what kind of work. I find a list like that very useful since it limits my finishing steps and stops me from overworking it (once the list is ticked off, the work is done).
Sometimes paintings stay in the kitchen for several months, sometimes for a day or just a short moment.
Anyway, every artist is different. This is my approach and I was so glad to hear that I’m not alone, with these steps. The more experienced you get the more you start to omit stages and you become even faster and more confident in your approach.
Happy painting!